
UE5
The UE5 section provides a comprehensive guide on how to properly set up and deliver your project to ensure you are getting the maximum out of YOM. The SDK contains solutions and templates specifically for quickly iterating game streams. A Checklist Before Starting (!):
If you are opting to use YOM within an existing Unreal Engine project, please check the Linux support for existing plugins. If your plugin does not officially support compile to Linux, in most cases it still compiles to Linux and if not on the first try, the fix is usually very simple.
Verify you have the right Clang version for cross-platform compiling. Install the cross-compile toolchain that you can find on the bottom of the page.
You need to install visual studio to build the headers for the SDK.
For multiplayer support you need to download and use the source version of Unreal Engine.
Step 1: Use a C++ UE5 Project
You need to use a C++ version of an UE5 project. This can be achieved by setting up a new project and selecting C++ as the project defaults or by converting your existing blueprint project to C++. There is no disadvantage for picking C++ over Blueprints as you can still use Blueprints throughout your project.
If you are converting from an existing project follow the following steps to convert it to a C++ project:
Click Tools -> select "new C++ class"
Select none as the parent class and press next.
Press create and it will convert your Blueprint project to a C++ project.
Step 2: Add the SDK to the project
To incorporate the necessary SDK into your project, follow these steps:
Close your project if you opened it as part of the previous step.
Navigate to your root project folder and create a new folder called "Plugins". This folder will serve as the container for the required plugins.
Obtain the YOM UE5 SDK for your Unreal Engine version from the link. If you don't have access, ask your YOM contact person. This will trigger a download of a ZIP file. The ZIP file will contain three plugins.
Extract the zip file and copy and paste the three plugins into the "Plugins" folder you need to create in your project directory. Ensure that the plugins are directly placed inside the "Plugins" folder and not within any additional subfolders.
Result
By following the steps outlined above, you should now have a folder structure resembling the following:
Step 3: Building the SDK
Now that everything is set, boot your project and compile the plugin headers. This need to be done once every time you update the SDK or add any other plugin and requires using a C++ project with Visual Studio installed. After it is set, it will automatically open the project
Opening the project for the first time can take a bit of time. Just be patient. It will boot.
YOM SDK should be enabled by default. Validate by checking if a new toolbar appeared in your navigation bar called 'YOM Toolbar'.

Follow these steps if the toolbar did not appear:
Click on "Edit" and select "Plugins" from the dropdown menu. This will open the Plugins window.
In the search bar within the Plugins window, type 'YOM' to search for the YOM Replicator SDK plugin.
Enable it. If the plugin does not appear, try restarting the editor and repeat this step.
Do the same for GltfRuntime and VaRest plugins in the same manner and enable them by clicking their respective checkboxes.
After enabling the plugins, it is recommended to restart the editor. This allows Unreal to load the plugins properly.
Step 4: Setting up the SDK
To configure the YOM Replicator SDK for your metaverse project, follow these steps:
Open the setup screen by navigating to "Tools" in the top menu. Select "YOM" and then choose "Setup Project." This will open the setup window.

In the setup window, you will find several settings that need to be configured. Here is an explanation of each setting:
Startup World: This setting sets the startup level. When we make a build this will be the starting point. As example it can be a mainmenu or if you don't have that the scene the game begins
Game World: This setting sets the game level. This is the level where the game takes place.
Player Asset: This setting defines the asset that players will control within the world. It can be any character or object that allows player interaction. The default character provided by the YOM plugin is the Yom_BP_ThirdPersonCharacter. Change it from "None" to "Yom_BP_ThirdPersonCharacter".
Playercontroller asset: The Playercontroller that is used the game world or you want to use in the game world.
GameMode asset: The GameMode that is used the game world or you want to use in the game world.
Webserver path: The path to the webserver you want to use. We already profite a example webserver.
Multiplayer project: If enabled, this setting allows the code from the SDK to be multiplayer. Enable this if you creating a game for multiplayer
Voice Chat: If enabled, this setting allows players to communicate with each other through voice chat within the experience.
Click "Begin Setup," and if the settings are correctly configured, a message will appear in the bottom right corner, instructing you to restart the editor. Click "Restart" to apply the changes.
In case you want to make any further adjustments or verify the setup, you can run the setup tool again or manually modify the settings.
Validate your configuration
After restarting, navigate to Content Drawer -> Content. You should now see a MetaspaceGameMode and a MetaspacePlayer. These assets can be used or extended to add further modifications and behavior to your experience. Then navigate to Settings -> World Settings, then validate the GameMode as shown in the provided screenshot.
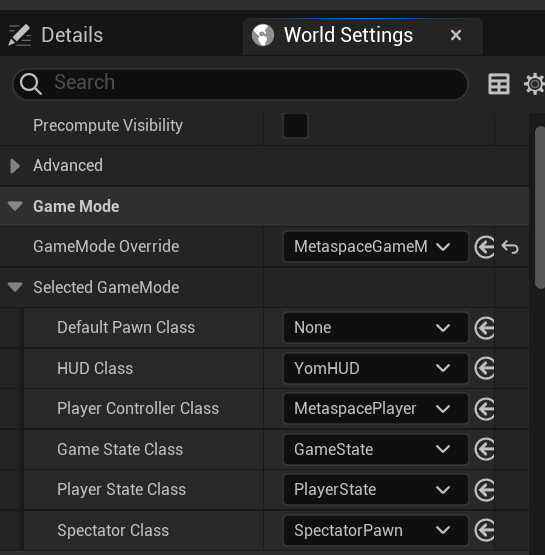
Note that the Default Pawn Class in the MetaspaceGameMode is intentionally set to None, as the pawn will be loaded into the game via the MetaspacePlayer.
Step 5: Debug Your Stream Locally
To test your game locally you can do this in three ways:
Stream to localhost:8888. This allows you to debug the full web experience, including player authentication. This is the default setting with all toggled turned off and is also the recommended setting to playtest the full experience.
Play it in viewport. If you want to quickly debug locally and you want to bypass the authentication window, you can opt for testing in the viewport. To enable this you need to toggle on 'Run in Editor' and 'Auto Spawn Player'.
Play in standalone. If you want to debug networking features without needing to first pass the authentication window in the web browser, you need to toggle on 'Auto Spawn Player'.

Toolbar
For these things we made the YOM Toolbar to easily test your game. We added some settings to help you test your game:
Launch Game. Launches the game with the below settings.
Run in Editor. When turned off it runs the game in stand alone and starts the signaling server. When turned on it will run the game in viewport and not start the signaling server.
Respawn Player. When turned off it runs the game in stand alone and starts the signaling server. When turned on it will run the game in viewport and not start the signaling server.
Auto Connect Player: When turned on it will execute the connect logic as you would connect from the pixelstreamer
Run Webserver: When turned on it will start the webserver when we press launch game
Run Webclient: When turned on it will start the webclient when we press launch game
Force Authentication. When true, if forces users to authenticate with their wallet else it will not work.
Number of Clients. You can select the number of clients it needs to boot up. It will also boot up another signalling server. You can connect to it by adding a port. 8888 is the first one second 8889 etc.
The YOM Toolbar it to make it easy to test locally. You can still use the default buttons to play the game and the settings will apply to it.
Result
Pressing the Launch Stream button, the servers and games will boot and you can debug your game within a webpage. Make sure to add a Player Start to the level if the character does not spawn automatically.
Step 6: Package for YOM
In Unreal Engine, go to the top bar: Tools → YOM → Package Project.
In the opened menu, select the paths to your client and server build folders.
If you used the recommended "Build" folder, paths should be automatically selected.
Click "Package Project" to create separate zip files for the client and server.
After the process completes, find a new folder called "BuildData" in your project directory.
Result
Inside "BuildData", you'll find two zip files, one for the client and one for the server, that are ready to upload to app.yom.net.
Last updated
Was this helpful?