
Configure your Stream
This page will explain how to set up your game to work with the features present in the YOM UE5 SDK and assumes a new project. For existing projects, you may already have modified the GameMode and PlayerController classes. To retain compatibility follow the following guide.
Step 1: Validate the SDK
YOM SDK should be enabled by default. Validate by checking if a new toolbar appeared in your navigation bar called 'YOM Toolbar'.

Follow these steps if the toolbar did not appear:
Click on "Edit" and select "Plugins" from the dropdown menu. This will open the Plugins window.
In the search bar within the Plugins window, type 'YOM' to search for the YOM Replicator SDK plugin.
Enable it. If the plugin does not appear, try restarting the editor and repeat this step.
Do the same for GltfRuntime and VaRest plugins in the same manner and enable them by clicking their respective checkboxes.
After enabling the plugins, it is recommended to restart the editor. This allows Unreal to load the plugins properly.
Step 2: Setting up the SDK
To configure the YOM Replicator SDK for your metaverse project, follow these steps:
Open the setup screen by navigating to "Tools" in the top menu. Select "YOM" and then choose "Setup Project." This will open the setup window.

In the setup window, you will find several settings that need to be configured. Here is an explanation of each setting:
Startup World: This setting sets the startup level. When we make a build this will be the starting point. As example it can be a mainmenu or if you don't have that the scene the game begins
Game World: This setting sets the game level. This is the level where the game takes place.
Player Asset: This setting defines the asset that players will control within the world. It can be any character or object that allows player interaction. The default character provided by the YOM plugin is the Yom_BP_ThirdPersonCharacter. Change it from "None" to "Yom_BP_ThirdPersonCharacter".
Playercontroller asset: The Playercontroller that is used the game world or you want to use in the game world.
GameMode asset: The GameMode that is used the game world or you want to use in the game world.
Webserver path: The path to the webserver you want to use. We already profite a example webserver.
Multiplayer project: If enabled, this setting allows the code from the SDK to be multiplayer. Enable this if you creating a game for multiplayer
Voice Chat: If enabled, this setting allows players to communicate with each other through voice chat within the experience.
Click "Begin Setup," and if the settings are correctly configured, a message will appear in the bottom right corner, instructing you to restart the editor. Click "Restart" to apply the changes.
In case you want to make any further adjustments or verify the setup, you can run the setup tool again or manually modify the settings.
Validate your configuration
After restarting, navigate to Content Drawer -> Content. You should now see a MetaspaceGameMode and a MetaspacePlayer. These assets can be used or extended to add further modifications and behavior to your experience. Then navigate to Settings -> World Settings, then validate the GameMode as shown in the provided screenshot.
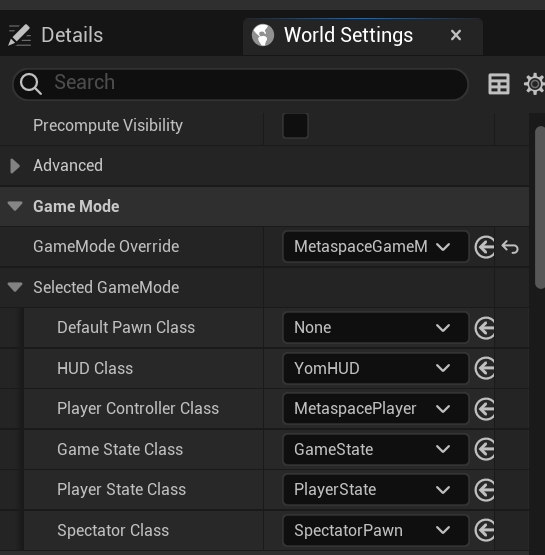
Note that the Default Pawn Class in the MetaspaceGameMode is intentionally set to None, as the pawn will be loaded into the game via the MetaspacePlayer.
Last updated
Was this helpful?